Sunday, August 14, 2022

Outlook not responding error


Outlook not responding error solve

 This problem occurs for one or more of the following reasons:

  • You have not installed the latest updates.
  • Outlook is in use by another process.
  • Outlook is loading external content, such as images in an email message.
  • A previously installed add-in is interfering with Outlook.
  • Your mailboxes are too large.
  • Your AppData folder is redirected to a network location.
  • You have to repair your Office programs.
  • Outlook data files have become corrupted or damaged.
  • Your installed antivirus software is outdated, or it conflicts with Outlook.
  • Your user profile has become corrupted.
  • Another program conflicts with Outlook.


Saturday, August 6, 2022

campus NW Design Master-Campus Core

  1. Which Dell EMC switch series would be the best option for a mid-market company that wants to implement virtual link trunking (VLT)in the core tier?

Ans: S-Series


2.which campus networking deployment option would be the best fit for a company that has a chassis core , is keeping legacy access switches and wants to centrally manage new access switches?

Ans: Hybrid deployment


3.A mid-sized content-streaming customer with a 10Gb Internet connection and 10GbE server/storage NICs needs to upgrade their campus network core.Which solution is the best fit for their needs?

 Ans:S4048-ON Pair of switches with virtual link trunking(VLT)


4.Which switch should you recommend to a customer looking for a networking solution that provides zero-touch installation of alternate network operating systems?

Ans:S4048-ON

Disk Usages 100% for Windows 10 (solved)

 There are some process to reduce disk usages 100% for windows 10


Process 1: Disable SuperFetch

Goto command prompt and it run as administrator

then write net.exe stop superfetch then enter 

if its not work then write net.exe stop sysmain


Process 2: Please Update your Windows all.


Process 3: Disk Check

Goto command prompt and it run as administrator

then write chkdsk.exe /f  /r then enter then Y then enter.

then restart your device.

Thursday, December 10, 2015

Setup Exchange Server 2010

Pre-Installation Checklist
Make sure you have all of the following steps in place before you setup Exchange Server 2010 on Windows Server 2008 R2 64 Bit.
For simplicity we are assuming you are setting up a small office where one machine will be used for both the Active Directory and the Exchange Server. This setup works just fine and reduces the number of machines to maintain. If you have a larger office you may want to consider separating the Active Directory machine and the Exchange 2010 Server. 
Install Windows Server 2008 R2 64 bit version
Exchange 2010 is a 64 bit application and requires 64 bit versions of Windows Server 2003 or Windows Server 2008.  You should select a computer that is capable of running the 64 bit version of Windows Server 2003 or 2008.  For this example, we will start with a clean installation of Windows Server 2008 R2 64 bit version that has not had any roles installed.
After installing Windows Server 2008 R2 we set the clock and the name of the server to be "EX2010".  At this point this server is configured to be a stand alone computer with default settings.

Configure Your Static IP Address
The default installation of Windows 2008 sets your IP v4 and IP v6 addresses to use DHCP.  Since we will be configuring this computer to be a domain controller, you must change the IP address of the computer to be a static IP address.
To change your IP address, click on "View Network Connections" in the Server Manager screen.  This will display the list of active network interfaces.

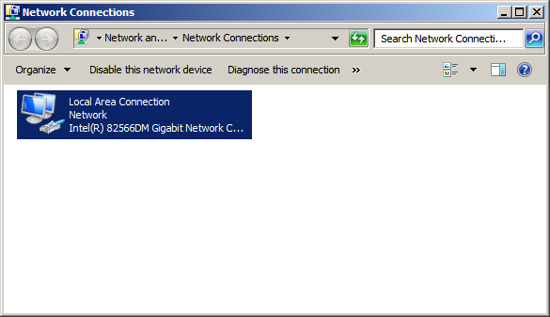
Double click on your network adaptor to display the adaptors status.

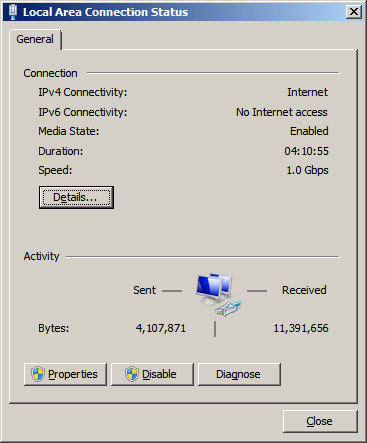
Press the Properties button.

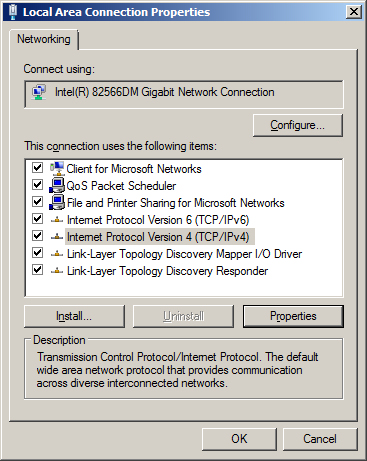
Highlight "Internet Protocol Version 4 (TCP/IPv4)" and then press the Properties button.

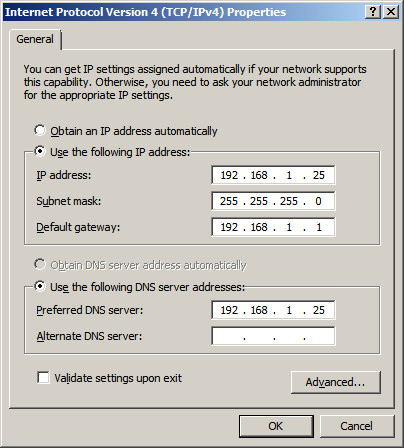
Change the radio button to "Use the following IP address" and enter an IP address you want to use for this server.  In our example, we chose to assign this server the internal IP address "192.168.1.25".  We also have a firewall appliance that operates as a gateway at the IP address "192.168.1.1". 
NOTE: It is important to include this computer in the DNS list.  You should list the IP address of this computer as the first entry in the list of DNS servers.  In the alternate DNS servers field, enter the IP address of a DNS server provided by your ISP.
Press OK to save your changes.
Now you will need to modify the support for IP v6.  If your network uses IP v6, then you will need to select "Internet Protocol Version 6 (TCP/IPv6)" , press the Properties button, then enter a static address.  If you are not using IP v6, you can leave the IP v6 set to the default setting of DHCP.
NOTE:  Exchange requires that IP V6 be enabled.  Even if you do not use IP V6 you must leave it enabled.  During the setup of Active Directory, the Active Directory Setup Wizard will check that both IP v4 and IP v6 have static addresses.  As long as the IP v4 address is static you can continue the installation.  DO NOT DISABLE IP V6 or else the Exchange Hub Transport Service will not start.
At this point you should have all IP addresses on this server configured as static IP addresses.  OR you have the IP v4 address configured as static and the IP v6 configured using DHCP.  Press OK to save your changes and close the Network Connection screen.
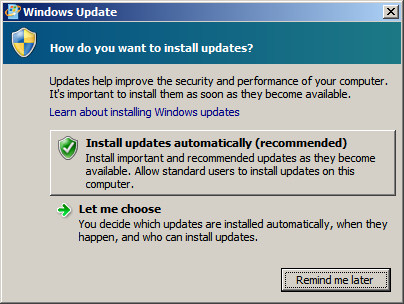
Activate Auto Update
The next step in making this server a Domain Controller is to activate auto update.  Active Directory will not install until this computer has auto updates active.  To activate auto updates, click on the link "Configure Updates" and then select the option to have Windows automatically install updates.   At this time Windows will download updates and will most likely need to reboot your computer.  Allow the updates to be applied and the computer to be restarted until all updates are applied before installing Active Directory.  You do not want to be in the middle of installing Active Directory when an auto update needs to reboot your computer.

Add role - Active Directory Services
The process of installing Active Directory consists of two steps:  the first step is to install Active Directory and the second step is to configure your Active Directory.  Once this is complete, your Windows Server will now be a Domain Controller.
Step 1 - Install Active Directory
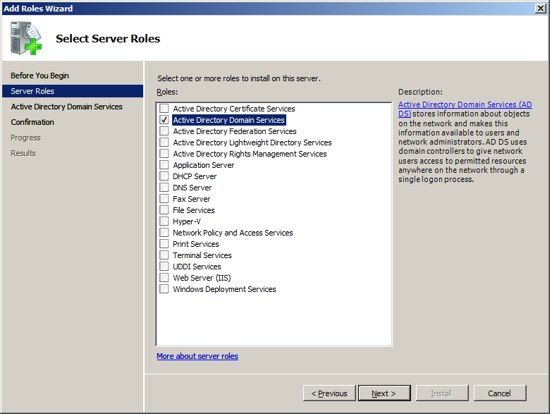
At the Computer Management Screen, press the "Add Roles" link. 
At the Select Server Roles dialog, check/tick the option "Active Directory Domain Services".

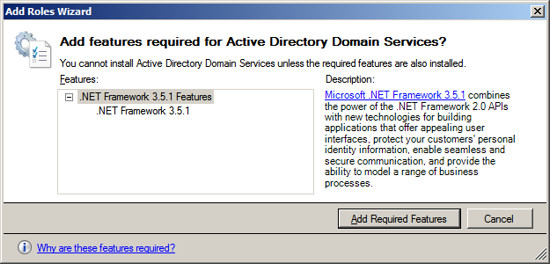
When you select Active Directory the Select Server Roles Screen will inform you that you also need to install the feature ".NET Framework 3.5.1".  Press the "Add Required Features" button.

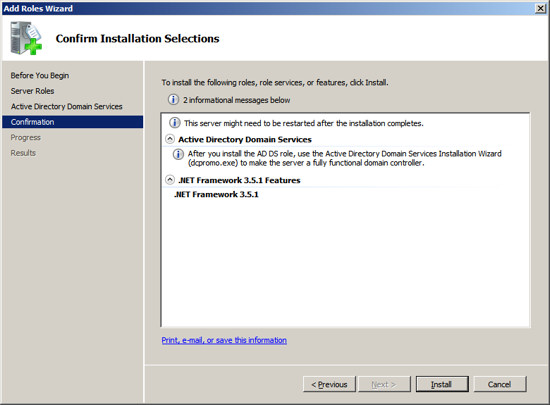
After acknowledging the required feature, press Next.
Active Directory Domain Services will present information about the changes it will make to your server.  Review this information and press Next.

Now the installation will scan your configuration and inform you if there are any pre-requisites that you have not fulfilled.  If the Active Directory Installation presents an errors, correct these at this time and then repeat the installation.  Once the Setup program indicates that you have met all pre-requisites, then press the Install button to start the installation process.

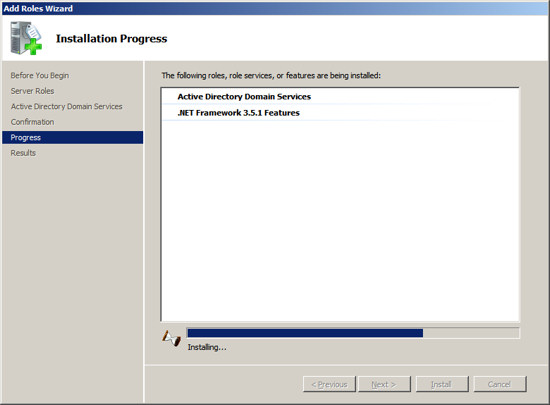
The setup program will now install Active Directory on your Server.

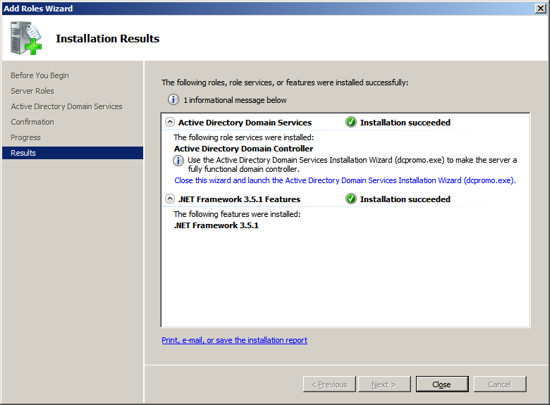
When the installation is complete, you should see a message indicating "Installation Succeeded". 
Press Close to return to the Server Management Screen.

Step 2 - Configure Active Directory
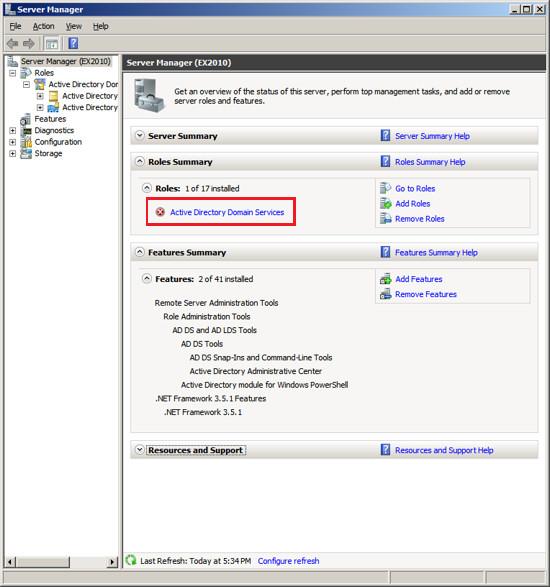
At the Server Management screen you should now see that you have 1 role installed.  The Active Directory Domain Services may indicate that it is installed but there are errors.  This is because the software is installed but not configured.

To configure Active Directory, click on the line under Roles labeled "Active Directory Domain Services".  The Server Manager will show you a page about the status of the Active Directory Role.

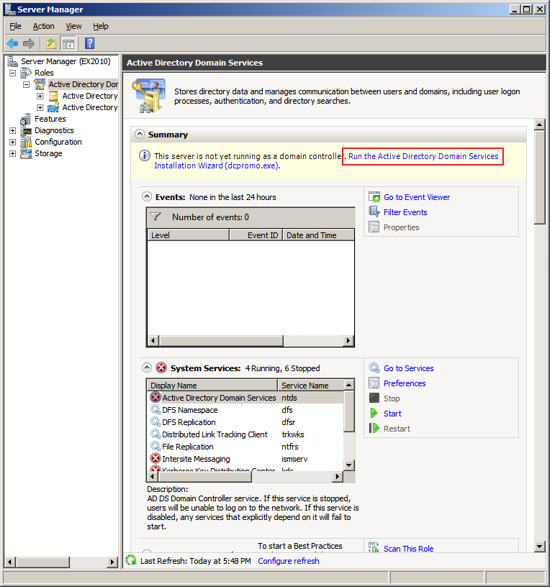
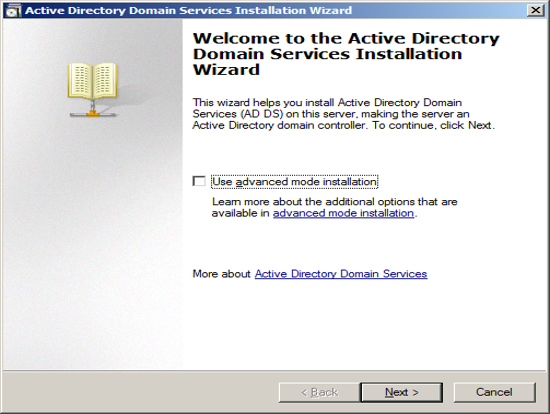
Click on the link "Run the Active Directory Services Installation Wizard (dcpromo.exe)".  When the Active Directory Domain Services Installation Wizard appears, press Next.

The Installation Wizard will present information about the version of Active directory, press Next.

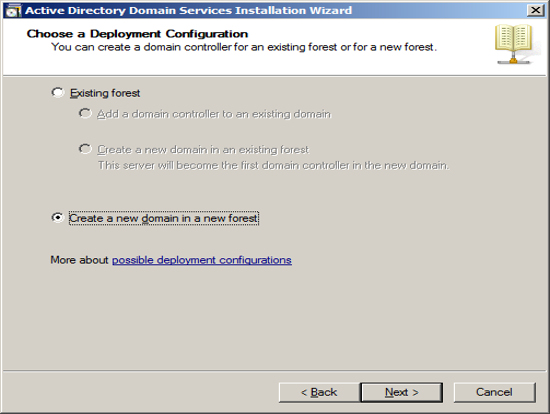
Since we are assuming this Exchange Server will be the first Domain Controller, we choose "create a new domain in a new forest".  Press Next.

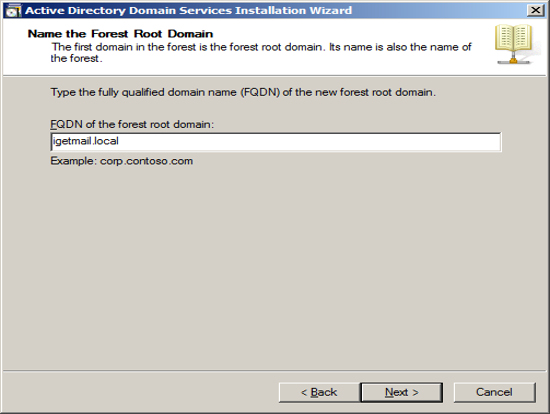
Enter the name of your domain.  The domain name you enter here is the domain name that Exchange will associated with all of your email.  If you use a hosting company to host your Internet Domain, then you may want to enter the name of your Internet domain with ".local".  If you host your own Internet Domain then you would enter your domain name here.
In our example, we are assuming that IGetMail.com is hosted at an Internet Hosting Company.  Since we do not host IGetMail.com on this Exchange Server, we will use IGetMail.local to indicate our internal domain for IGetMail. 
NOTE:  Once you enter your domain name it is very hard to change it in the future, so you should take great care when enter this name. 
Once you have decided on the name of your internal domain, that will be your Active Directory Domain and the domain serviced by Exchange, press Next.

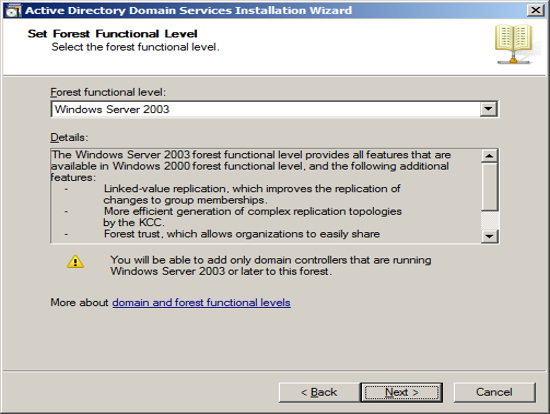
The Installation Wizard will now ask you about compatibility.  If you plan to have domain controllers running various versions of Active Directory, then you will want to chose a function level to include the lowest version of Windows that you are using for domain controllers.  Press Next.

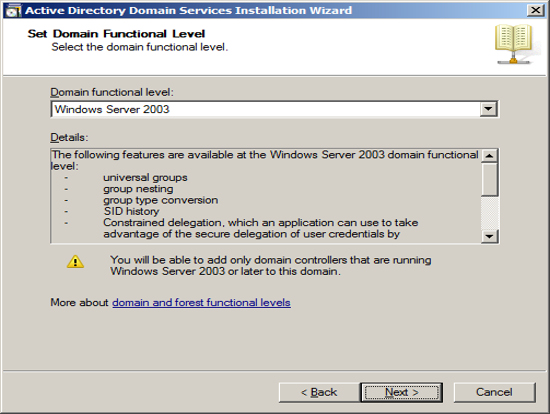
You will be asked a similar question which is at the domain level instead of the forest level on the previous screen.  You should follow the same approach and include the function level to include the lowest version of Windows you plan to use for domain controllers.  Press Next.

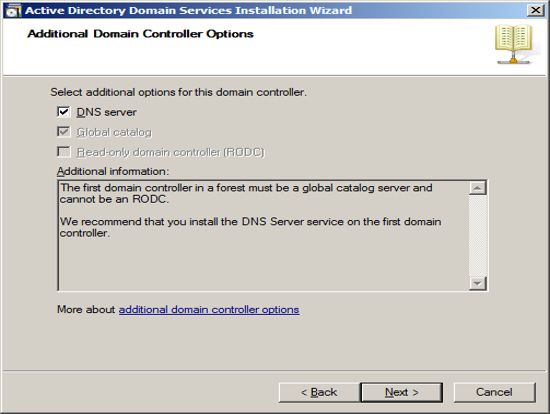
The first Domain Controller needs to have a DNS server running locally.  The optimal location is to start out with having the installation wizard install the DNS server locally.  Also, it will automatically make this computer a global catalog server.  Press Next.

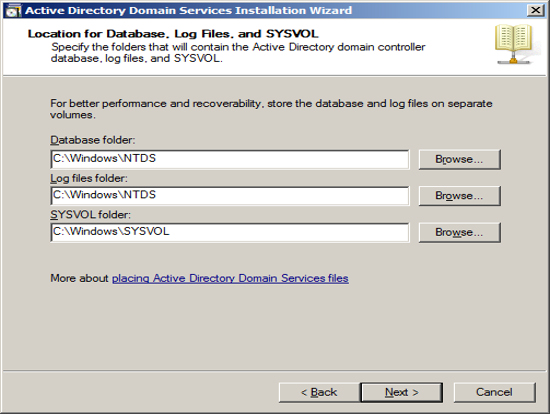
You can specify where you want Active Directory to store its data.  If you only have one drive in your Server, then use the defaults.  If you have multiple drives, you can select which drive to use.  Press Next.

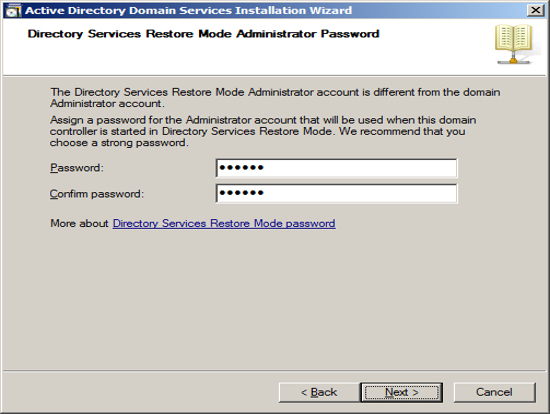
Should you need to restore Active Directory in the event of a hard drive failure, you will need to boot your Server into a special mode called "Directory Restoration Mode".  Should you need to boot your computer into this special mode, you will need to use a special password just for this restoration.  You can define this password at this time.  NOTE:  This password is different than the administrator account and if you change the administrator password this password will not change.  So you will need to store this password forever in a safe place.  Press Next.

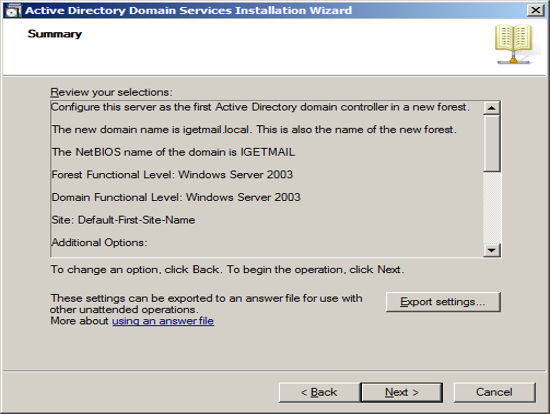
Now the Installation Wizard will summarize the configuration that it is about to create.  To start the process of configuring your new Domain Controller, press Next.

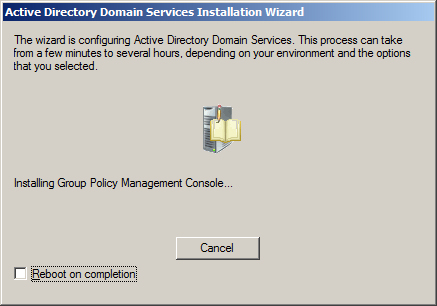
The Installation Wizard will show its progress as it configures your Server.   This will take a long time.

When the installation is complete, you will be shown a final screen.
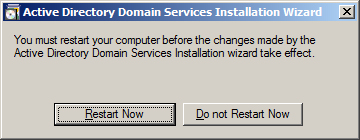
  Press Finish.

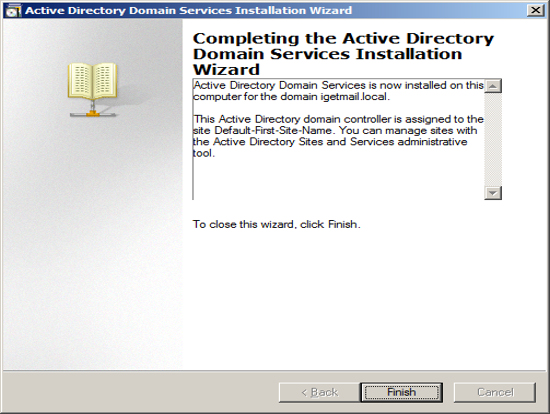
Then restart your computer.
After restarting your computer, Windows should show you the Server Manager.  You should see on the Server Manager screen that you have Active Directory and DNS Server roles installed.  Also the process of installing Active Directory will add the features "Group Policy Management" and "Remote Server Administration Tools".

Sunday, November 15, 2015

Create an iTunes Store, App Store, or iBooks Store account without a credit card or other payment method

Learn what to do if you don't want to associate a payment method with your iTunes Store, App Store, or iBooks Store accounts.

When you use your Apple ID to sign in to the iTunes Store, App Store, or iBooks Store for the first time, you're asked to enter a payment method so that you can purchase items from the store. Follow these steps if you don't want to associate a payment method with your account.
Apple recommends using only one Apple ID for all Apple features and services that use Apple ID. If you don’t remember if you have an Apple ID, we’ll help you find it.
A credit card is required to set up accounts for children. Learn more about Apple IDs for kids.

If you already have an Apple ID

If you've already created your Apple ID, you'll need to add a payment method when you first use it to sign in to the iTunes Store, App Store, or iBooks Store. But you can optionally remove the payment method after you sign in to the store. You won't be asked for a payment method again until you make your first purchase.

If you don't have an Apple ID

If you haven't created your Apple ID, follow the steps below to create one and a store account at the same time, without adding a payment method.


On an iPhone, iPad, or iPod touch

  1. Open the App Store, iTunes Store, or iBooks Store.
  2. Choose any free app, song, video, or book.
  3. Tap Get next to the item, then tap again to get it.
  4. When you're asked to sign in with an Apple ID, tap Create New Apple ID.
  5. Follow the onscreen instructions. When you're asked for payment information, choose None. See what to do if None isn't showing or you can't select it.
  6. After you enter all of the information required, you'll be asked to verify your Apple ID by email. You must verify your Apple ID before you can begin using it. Didn't receive the email?
If you use Family Sharing, and you’re the family organizer, you can’t set your payment information to None. You'll need to use a credit card or debit card.

On a Mac or PC

  1. Open iTunes, then go to the iTunes Store by clicking the iTunes Store button at the top of the window.
  2. Scroll down and find the country flag in the lower-right corner of the window. If it's not the flag of the country where you live, click it and choose your country or region.
  3. Go to the App Store, Music, TV Shows, or Books section of the store by clicking on one of the icons in the upper-left corner.
  4. Download a free app, song, video, or book. To find free items, look in the right column of the window and click any link that includes the word "Free," such as "Free on iTunes" or "Top Free." When you find a free item, click Get beneath its icon.
  5. When you're asked to sign in with an Apple ID, click Create Apple ID.
  6. Follow the onscreen instructions. When you're asked for payment information, choose None as the payment type. See what to do if None isn't showing or you can't select it.
  7. After you enter all of the information required, you'll be asked to verify your Apple ID by email. You must verify your Apple ID before you can begin using it. Didn't receive the email?


**Collected from support.apple.com

Thursday, October 29, 2015

Dell Tech Driect Exam 2015 Dell™ Training for Dell™ Chromebook 11

1.
The Dell Chromebook 11 does not consist of ePSA, Dell BIOS or F12 menu. All diagnostics are dependent on the Google Chrome OS. CROSH Test is used to run diagnostics. What is the command used to for a more complete list of commands for debugging purposes?


help

Ctrl + M

help_advanced

Ctrl + M + T
2.You suspect a possible memory failure. What memory test should be run to verify the failure?
 Press Ctrl + Alt + T. Type memory_test 
Press Ctrl + Alt + D. Type memory_test 
Press Ctrl + M. Type memory_test 
Run the ePSA Diagnostics Test
3.What is the purpose of RMA Shim to be carried out in Dell Chromebook 11 after any electrical parts being replaced?
  To ensure the parts replacement passes the diagnostics, enumerates the Hardware ID and re-installs the OS 
To ensure the LCD Display brightness and contrast is at optimal level 
To ensure the processor ID is matched with the memory ID
 To register new License Key for Chrome OS
4.Where can you obtain the RMA Shim utilities files to run the process?
  When creatinge a dispatch for Chromebook in Tech Direct webpage
 Dell Support website
 Request from Dell Technical Support agent
 Tech Direct main login page
5.What parts are NOT required to run RMA Shim process after replacing the parts in Dell Chromebook 11? (Select all that apply.)
  SSD
 SD Memory Card
 WLAN Card
 Battery
 System Board
 Bottom Cover
6.It is recommended that the Fan module is removed before sliding and remove the WLAN card from its slot. The reason is due to space constraints between the WLAN card and Fan module. True or False?
  True
 False
7.If you found the Dell Chromebook Keyboard is faulty and need to be replaced, what is the part you will request Dell Technical Support agent to dispatch?
  Palmrest Assembly
 System Board only
 LCD Assembly
 Keyboard only
8.Dell Chromebook 11 LCD Display is blank. You have tried to plug in AC Adapter and restart the Chromebook by holding down until the device turns off then turning it back on again. What is the next step of testing before requesting for hardware replacement?
  Run ePSA test
 Reset or Recover the Chromebook 
Press ESC key two times
 Press F12 during system starts up
9.What is the command to run a battery test by using CROSH on the web browser?
  diag_battery 
     battery_test
  battery_diagnostics 
  test_battery
10.What will be the issue when the Status LED light located at the front right of the Chromebook is blinking amber?
  AC Powered, charge level less that 97% charging
 AC Powered, charge level higher that 97%
 Battery powered, charge level less that 10%
 Battery Error

Monday, October 19, 2015

DRDB0112WBTS - DR4100 Introduction and Sales Overview v2 0813

1. Which of the following is not considered a key function of the DR4100?
inline deduplication
replication
disruptive deployment
protocol support
2. What percentage of all data is stored on PC desktops or laptop computers, according to a recent study by Small Business Computing?
54%
60%
65%
80%
3. As a technology, ___________ is about reducing and or eliminating redundant pieces of data
rehydration
deduplication
replication
backup
4. Which of the following is not a factor in the DR4100 Total Cost of Ownership (TCO)?
it scales up in physical storage capacity
it reduces the backup storage costs
it has all-inclusive licensing
it is a digital storage device
5. Which of the following best completes the statement? The DR4100 is _______________ dedicated to data deduplication for backups.
a software solution
a hardware appliance
a combination of a hardware and software solution
a virtual software solution
6. Which role is not considered a potential target persona for the DR4100?
IT Manager
Backup Administrator
Database Administrator
Financial Analyst
7. Which is not a benefit of the DR4100 for backup and recovery?
handles large data growth
provides data protection
provides a network firewall
keeps backup and storage costs low
8. With disk based expansion, the DR4100 can have up to ______ GB of raw usable capacity
2.7 TB
27 TB
8.1 TB
81 TB
9. Which of the following is not a key feature of the DR4100?
backup
deduplication
compression
security
10. What percentage of business data loss is due to human-induced disasters, as reported by the Association of Information Technology Professionals?
75%
99%
26%
80%